How to bring HDMI sources into Skype and Zoom with ClonerAlliance Flint series products?

The COVID-19 pandemic is still spreading all over the world and will exist for a long time to come. Some preventive measures such as home isolation and social distancing will increase the demand for virtual meetings and remote learning.
Many people using web-based conferencing software want to incorporate live HDMI video sources into their online meetings. Many people wish to use a dedicated camera to provide better video quality than a standard webcam, while others may need to share content from other computers or sources. To do this, you may need a reliable, low-latency video capture device that is compatible with your computer and operating system, such as macOS or Windows.
This article will walk you through how to bring an HDMI signal from a video camera into Skype using a ClonerAlliance video capture device. The workflow for bringing such sources into other software such as Zoom is similar.
Which models of ClonerAlliance products can be used as a webcam to stream via Zoom or Skype?
ClonerAlliance UHD Pro, ClonerAlliance Flint and Chert Series Products work with Zoom or Skype directly.
ClonerAlliance Flint and Chert Series Products refer to ClonerAlliance Flint LX, ClonerAlliance Flint LXT, ClonerAlliance Flint 4KP, ClonerAlliance Flint 4KP Plus, ClonerAlliance Flint 4KP Pro, ClonerAlliance Flint D4P, ClonerAlliance Chert 4KC, ClonerAlliance Chert HDC.
ClonerAlliance Box Pro, ClonerAlliance Box Evolve, ClonerAlliance Box Turbo can work with Zoom or Skype after installing ClonerAlliance Helper.
First, you need to get the following devices prepared:
One computer with Skype installed.
One ClonerAlliance capture device.
One USB 3.0 cable, and one or more HDMI cables.
One camera
Step 1: Visit the official website of Skype and download the software, then install it and sign in.
Step 2: If you are using one external camera for your Skype meeting, you can use a ClonerAlliance video capture device to bring the video signal into Skype. You can just connect the camera to the capture device with an HDMI cable, and then connect the capture device to your computer via a USB cable.
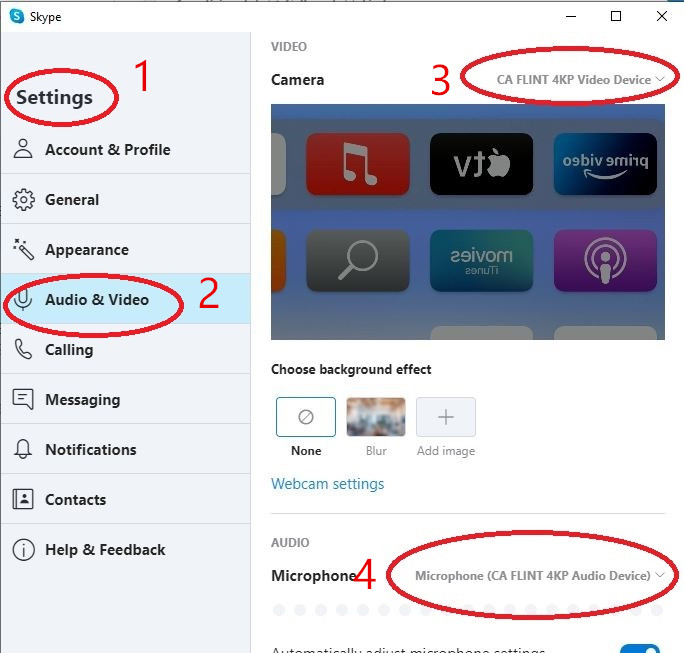
Step 3: Once you have logged into Skype, go into the Settings panel, and click Audio & Video. You will find all available ClonerAlliance capture sources in the pull-down Camera list. Select your desired camera source, and you can preview the source when the channel is selected for display. In the Microphone list, you can choose your desired speakers and microphone according to your meeting environment and needs. Audio from your ClonerAlliance capture device can be selected by choosing the device and corresponding video channel on the Microphone pull-down menu.
Step 4: After choosing your video and audio device, you can return to the Skype home page to start a new meeting or join one.